I was asked to make an image of an innocent yet evil face and I thought "that shouldn't be too difficult". Just search a few stock photo sites, pay my $40 and the job will be done...
Oh how wrong I was.
After many hours of trawling through thousands of images and sending screen grabs of potential candidates to the client, it dawned on me that I would have to make a 3D mesh head, UV it and then add (hopefully just) a texture map. The character needed to be young-ish - in her early 20's, blonde, roundish faced, innocent on the outside but showing hidden depths of malevolence.
So, time to search the net for a reference image. About the best image found was one from an American photographer called Pasha Bellman.

https://www.pashabelmanphotography.com/category/myrtle-beach-wedding-photographers/
This lady is too good looking, our girl needed to be more plain and homely with that "spark of sinister mischief" that was needed... Not only that, it is copyright and I am sure the bride in the photo would not have liked being portrayed as a mass murderer!
Time to fire up 3DS Max. I have Max 2009 at home and that is more than good enough for what I needed.
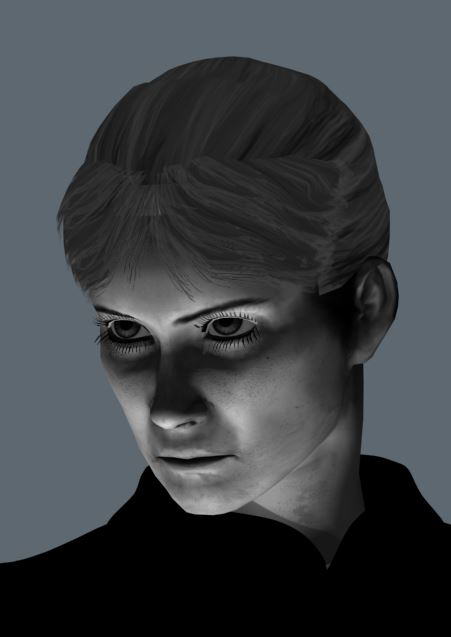
Here is the finished face used in the book cover image

First the face. I had a generic head I made for the Hilary character used for the cover of the first book. The mesh was pretty basic and crude but it had two eyes, a nose and a mouth in roughly the right places so it was a matter of sub dividing and putting edge loops in the right places to allow decent morph targets to be made so that I could none destructively mix and match expressions.
Here is the base mesh with the extra edge loops added to create a smoother, more human face.

But before the making of the morph targets I had to texture the head,
As stated in the original blog post, it took several hours of work to stitch together and merge many photos from the 3DSK human reference website, in Photoshop. Here is the texture map used on the character.
It is worth noting that if I were to be making this texture for a game asset the texture would be twice as wide as it is tall and the rest of the texture would be the hair at the back of the head plus some transparent areas with hair strands/clumps that could be overlayed on extra polygons over the head mesh to make the hair more volumous. The hair would also have been brightened to bring out some of the detail in it. There would also be texture areas for the inside of the mouth, tongue, teeth and gums, but these were not needed for this job.

Below are the morph targets. From this image you cannot see what they do but basically each one has a different part of a different expression or face change shape (a more buttoned nose, or wider jaw, or fatter cheeks). In most 3D software there is some kind of morphing ability. The technique is usually that you duplicate the base mesh and then move the vertexes on the duplicated mesh to the desired position - move the mouth corners into a smile for example, but dont do the eye part of the smile. Then you duplicate the original base mesh again and move some different vertexes about - for the upper cheek and eye squeeze part of a smile. These tafgets are assigned to sliders in the morpher and so adjusting the slider lets you "dial in" how much of each target you want. You are not limited to just dialing in one or the other, you can overlay many targets at once. That is why you dont do an entire expression in one target. Say, for example, you did a full face smile (mouth cheeks and eyes) and you also had a full face smirk. You later found you wanted to use the eyes of one but the mouth of the other. By dialing in 100% of both targets (to get the good eyes and the good mouth) you also get the bad stuff you dont want. Worse than that 100% plus 100% will give you 200% of any vertex that has been moved in both the morph targets which can end up with eyelids "overshooting" and mouth corners burrying themselves in the ears etc etc

Too many morph targets spoil the look!

With the correct blending you can get a reasonable approximation of realistic expression. With more time the results can be excellent, but since the brief did not involve the word "happy" I didnt go any further

Here is the "happy" face with the finished camera angle. Since I knew the neck would be almost entirely in shadow I didn't worry about extending the texture. This also has the first attempt at the eyelashes done as a somple alpha transparency paint job. You can see the polygons waiting for the texture in the third image from the top. As you can see, they are way too long. I think Revlon would be proud :-p

Here she is with first pass lighting and both sets of eyelashes.
In a client review it was decided to make the eye makeup more "Jack Sparrow"and get rid of "the London Look" eyelashes.

Here she is again from another angle with a sinple mesh and hand drawn texture for her hair, her biker jacket back on and second pass eyelashes. The main texture was revised to add texture to the neck. The idea behind the hair was to give a quick and dirty idea of a hair style before fighting with the 3DS Max hair system which I had not used before.
After this review it was decided to hand paint a quick height map to add in some of the creases and folds people get on their forehead and under the eyes. I also extracted the high frequency information from the texturemap (Photoshop Filters/Other/Highpass) to get the skin pores and smaller creases at the corner of the eyes. This was then converted to a normal map and added to the face material.
If I had been doing this at work I would have dropped her into ZBrush and done a proper sculpt before taking the Zbrush and original meshes into XNormal and baking the high detail (but untextured) mesh onto the low detail (but textured) mesh.
OK I could have taken the texture and UVs across into ZBrush but then all the morph targets would not have been valid on the high resolution head.
Anyway, all this is moot because I don't have ZBrush at home!
By the way, if you ever want to play with creating normal maps I really cannot recommend XNormal enough. It is way faster than using Max or Maya and it is FREE
In the end I gave up on the Max hair system and photobashed the hair in from a couple of high resolution photos from 3DSK. She also lost the biker jacket for the final render as well.
Finally it was decided to add a wider jaw, wider cheeks and more buttoned nose by use of some more morph targets.She had quite a heavy re-light and even then there was quite a bit of brightness contras work done in Photoshop
And here is the finished result (really should tidy up the hair photobash!)

No comments:
Post a Comment