Hello gentle visitor, I am guessing if you landed here you came from Pye's blog, but while you are here why not have a mooch around at some of the other pages.
For those of you who want a speedy overview of how I made the helmet. please read on...
The basic helmet.
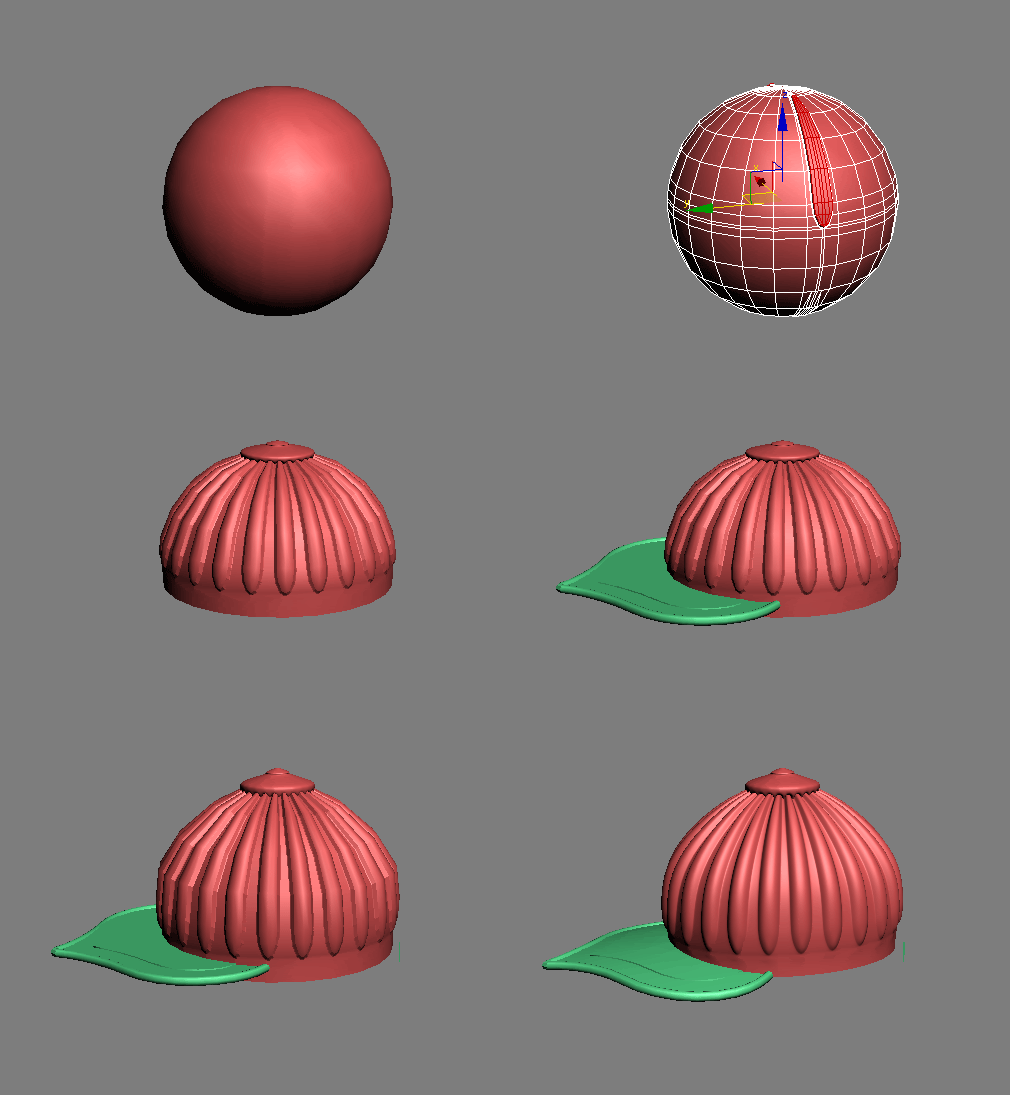
Right then. So I wanted the helmet to have 20 "flutes" (the raised bits an the sides) and decided that the best way might be to work on 1 segment of a 20 sided sphere, then once I was happy with that delete the other 19 segments and then duplicate the worked up 1/20th to form the basis of the pot.
The next major decision was to use a low resolution mesh and then use "subdivision surfaces" to get the required detail and smoothness. In 3DS Max that means using the "TurboSmooth" or "MeshSmooth" modifier and the way Max creates mesh from these is a dark art all of its own. Basically if you don't know what you are doing you end up turning everything you make into a slightly malformed pebble!
You could say "But Andy. Why not just boulian a bunch of stuff together. Wouldn't that have been easier and quicker?"
And you might be right if I were making a quick and dirty mesh, but boulian always leaves little triangular nasties in the joins that can cause problems later. Working with a Turbo Smoother control mesh produces cleaner topology and it is easier to apply and edit the texture mapping co-ordinates on a low res mesh and let turbo smooth cascade the information up to the denser mesh than it is to work with a high res boulianed mesh. Anyway, this is my project and I am doing it my way, so there!
OK, so that is how the basic pot was done. The peak was done by "lofting" (rail extruding) a cross section of the peak along a spline that ran along the outside edge of one half of where I wanted the peak to go. It was then a matter of extruding edges to get the mesh to meet up with the pot. Then tidying up what would become the mid line and then duplicating and mirroring that to make the other half.
I then used the "ffd" (free form deformation) modifier to make the helmet oval shaped and to bend the peak... And that is about it.
The earpiece.
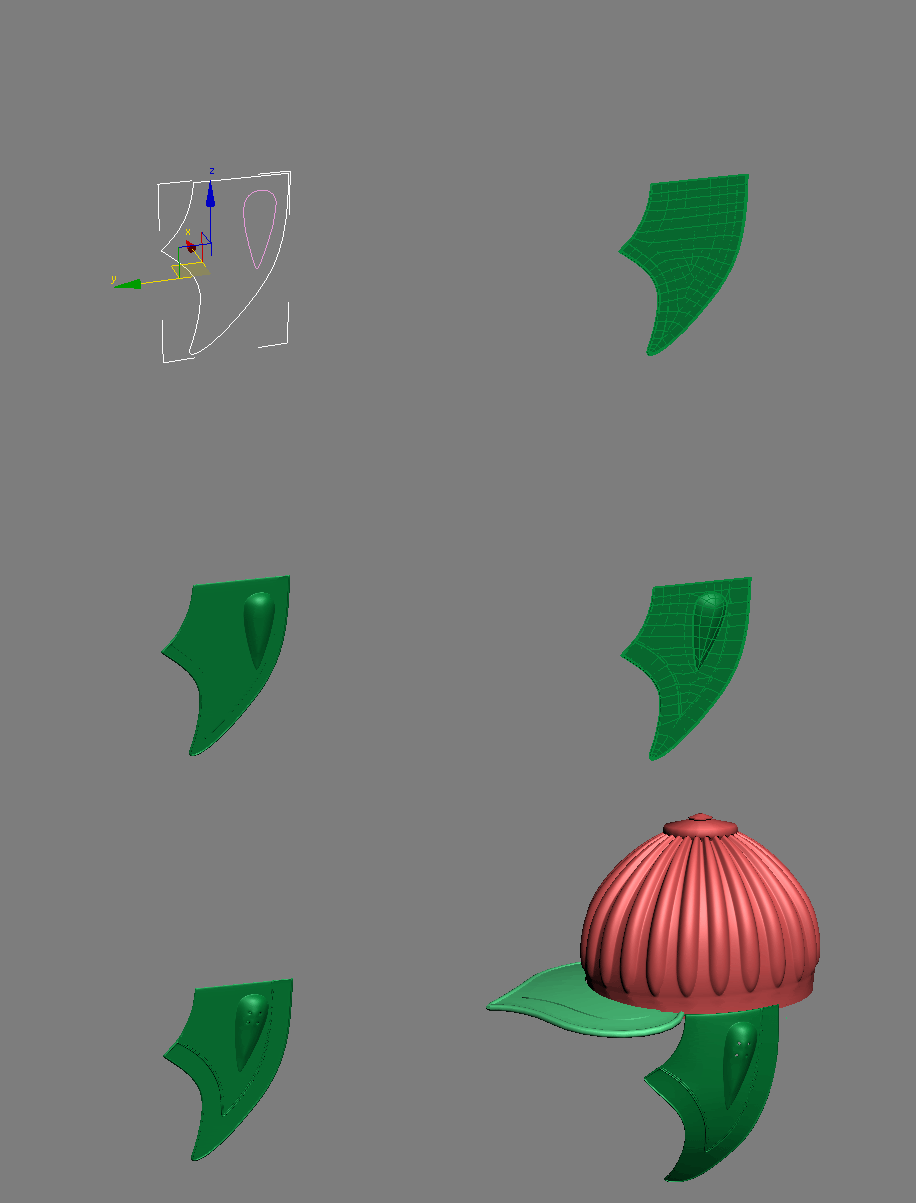
This is quite a complicated beast as it has raised linear detail, a big... umm.. lump where the sticky out bit of a persons ear actually is and then holes in that lump..
So. I started off with a spline that defined the outer profile of the whole shape. This was then extruded and then a series of "insets" made to add extra polygons inside the shape so that when the earpiece is bent there are polys there to actually bend. 3D systems are a bit dumb that way. If those extra polys are not there then it would have been like moving the sides of a bit of stretched rubber. The shape would just take the shortest distance between the two outer edges. in other words it would still be flat. The extra polys allow the bend to work on the points in between to create a curved shape.
Right so all the extra faces are where i need them so I then selected the relevant edges and made the extra detail for the raised lines by extruding, bevelling and edge dividing.
The earlobe shape was then made by pulling about the existing faces and then cleaning up the resulting crossed faces etc. That was then inset, bevelled and extruded to get the shape I wanted. I made sure that whatever was done to the side you can see in the image I also did to the back face but in reverse so the earpiece had a constant thickness. I then moved the lobe piece about until I was happy with the position. Finally I cut 4 square holes that allow sound to get to the wearers ear in the real helmet.
"Why 'square' holes?" I hear you ask. Well, this is the joy of the TurboSmooth modifier. Do you remember I said it turned everything into pebbled if you don't know what you are doing? Well It will happily turn a simple square hole into a lovely chamfered circular hole by default.. Brilliant! that is just what I needed!
So the final touch is to bend the flat earpiece into shape. As usual with 3D software there are half a dozen ways of getting the same result. It is just a matter of knowing which one will do what you want without screwing up in some other way. The way that would have given the least mushed up result would have been a "bend" on top of a "bend" to get it to the curve of the helmet and then the tuck under the chin... only the bend modifier is "uniform" in its change of angle over distance and I needed it to be more curved in some places compared to others so I ended up with your friend and mine, the ffd modifier. It can produce some weird distortions in odd places, but to be hones, from the distance I was going to be doing the final render, you cannot see them.
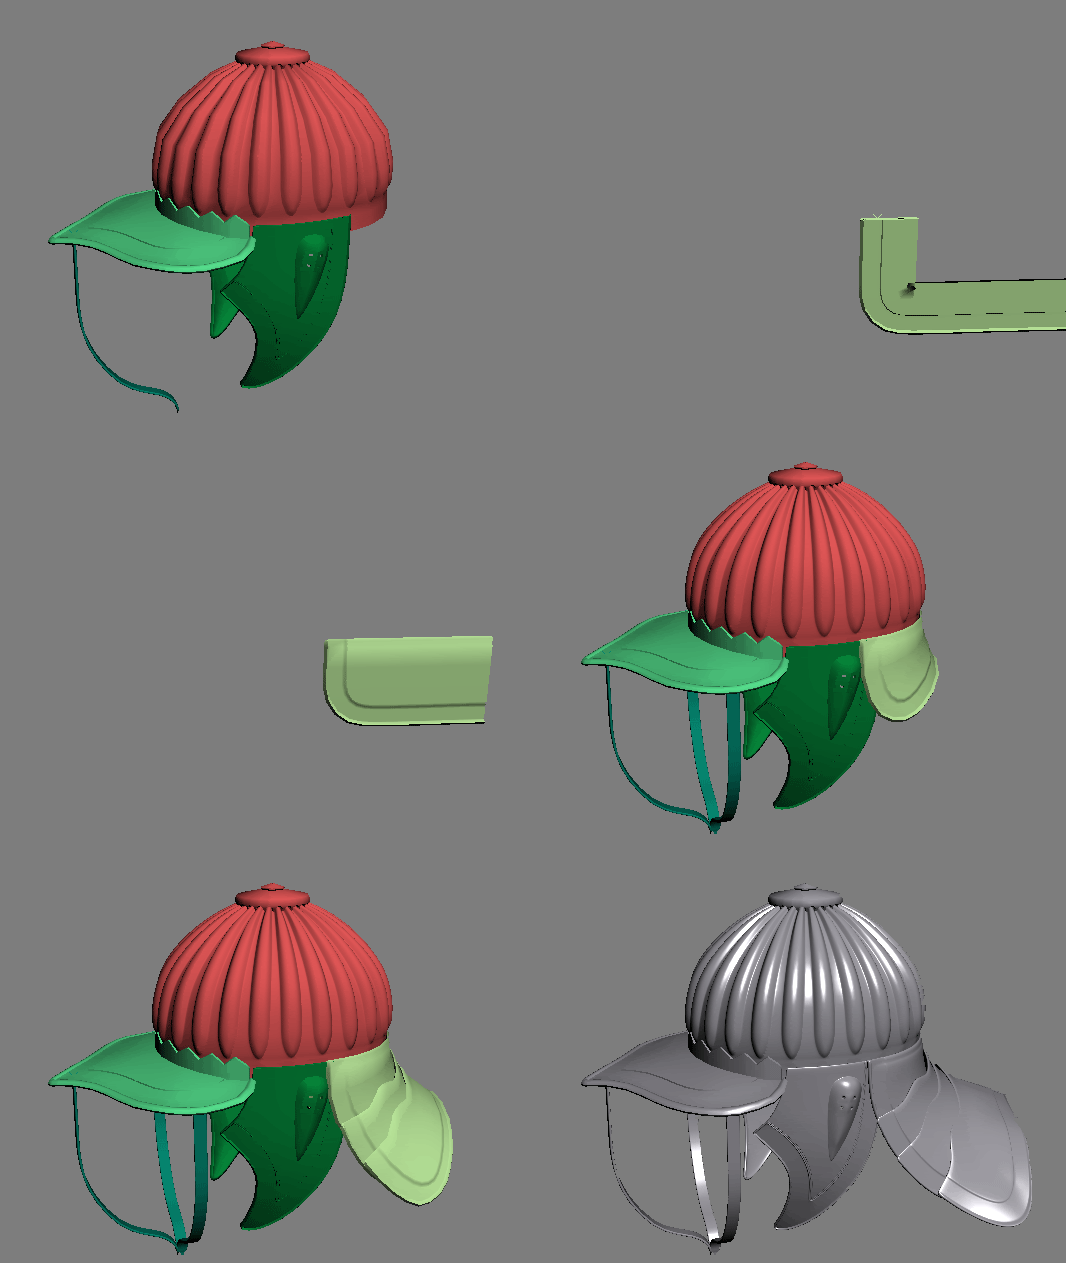
Well, that's the earpiece made... on to the face guard and lobster tails..
The faceguard and lobster tails.
These were actually quite simple.
I mas a spline that matched the side profile of one of the pieces of metal that make the guard and then "lofted" (extruded) a chamfered rectangle along it. Once this was done the loft rollout has extra deform controls at the very bottom and I used these to taper and shape the bottom end. It was then just a matter of copying this first guard a couple of times and rotating them 90 degrees to form the side rails. Then just scale to taste!
The Lobster pot tails are a little more complex. I started making just one segment and used the same technique as for the helmet peak to get the basic shape and then used 2 bend and one taper modifiers to turn the flat shape into the correct rounded and fluted shape. It was then just a matter of duplicating the section and adjusting the bends and taper to continue the sweep of the tail.
As Alexander Orlof might say... "Simples!"
Tune in next week for the crown.
The Crown.
I originally wanted to do a segmented "battle" crown that the old kings of England wore. These were made out of about sixteen hinged sections like a mayors chain of office so that it can reshape its self to fit either the kings head or the kings battle helmet. They carried no jewels and were usualy made of pure gold.
I would post a picture but I cannot find one on the net... Guess the internet isn't quite the sum of all human knowledge after all!
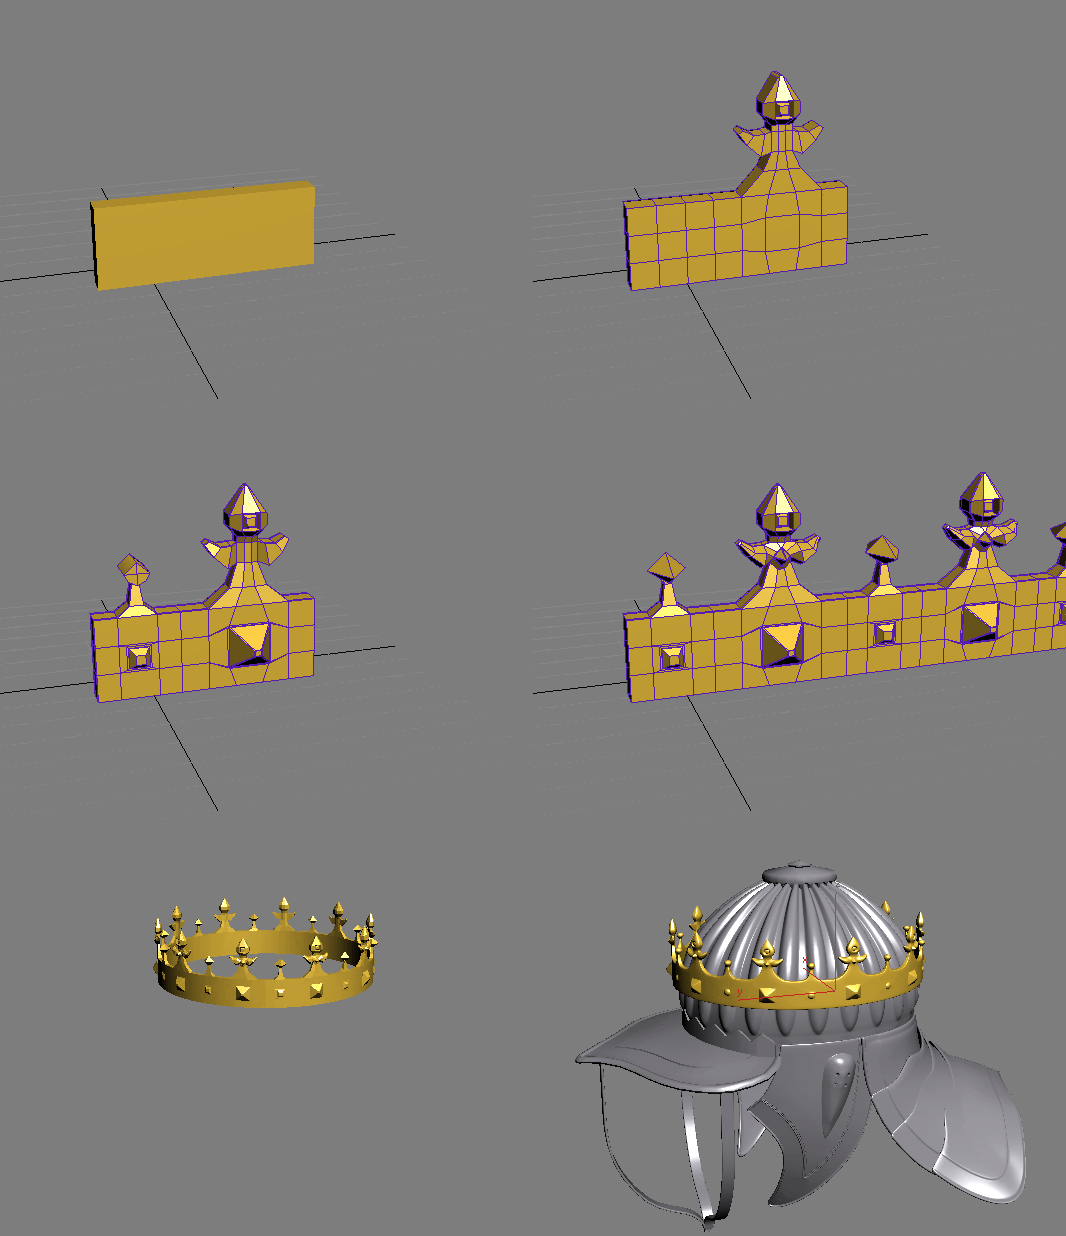
Anyhoo. I still decided to make the crown from repeating segments but then bolt them all together into one continuous mesh later... So, start with a simple rectangular box. Slice it up a little and then extrude bits to taste...
Once I was happy with the simple shape and knobbly bits, I then duplicated the section ten times, welded all the end bits together and then applied a 360 degree bend modifier to get the long, long, flat thing into a crown shape. This was then added to the rest of the helmet and then scaled and free form deformed to fit the shape of the pot. Finally the whole thing was turbo smoothed to make it all round and flowing.
If you are lucky (and not too bored already) I'll tell you about making gold materials and painting scarred up leather and steel texture maps... :)


